Overview
The objective of this guide is to help you to implement a pending (or draft) consignment workflow.
The primary reasons you would use this workflow over a create consignment workflow are:
- You want the user to see prices for various carriers/services and select a specific carrier in MachShip
- You want the user to manually add package data due to your packing process
- Your system does not have all the package data required to create a full consignment
- We require length, width, height, weight and item type (pallet, carton etc) for all packages
- Your creating dangerous goods consignments, and your system does not have all the required DG data
Workflow Demo & Diagram
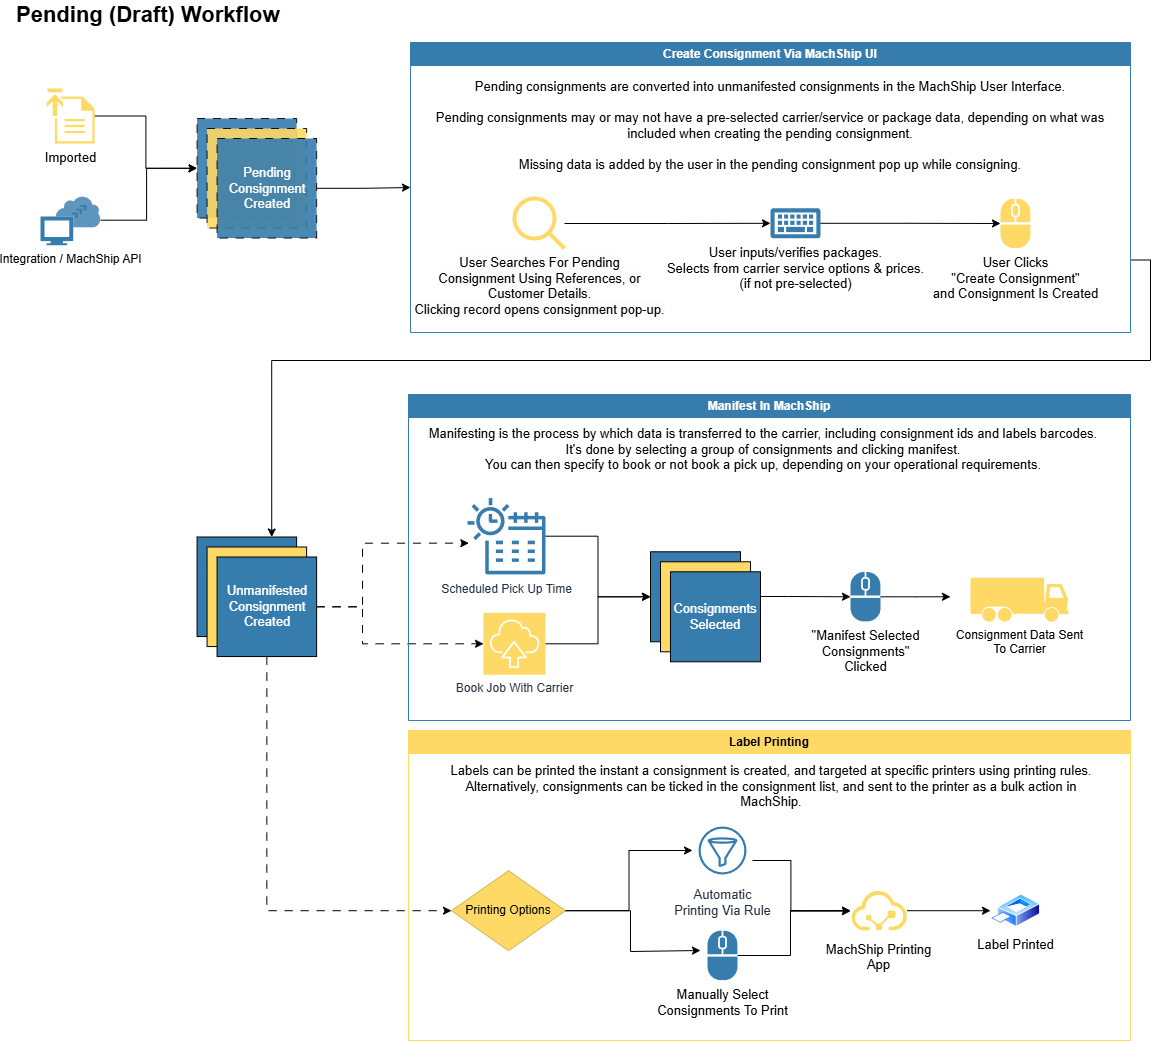
Here is a summary of the workflow:
- Shipment/order created in your system
- A pending consignment is created in Machship with FROM address, TO address, and reference numbers.
- Packages and/or carrier can also be allocated as well.
- User picks/packs the order, opens MachShip and inputs one of the reference numbers to search for the pre-filled consignment from step 2
- User then has the option to:
- Add or modify the packages
- Select a carrier and/or service
- Labels print out
- (optional) You collect updates about the consignment and push them back to your system
Here is a demo of the workflow in action:
[Add Video Here]
Workflow Implementation
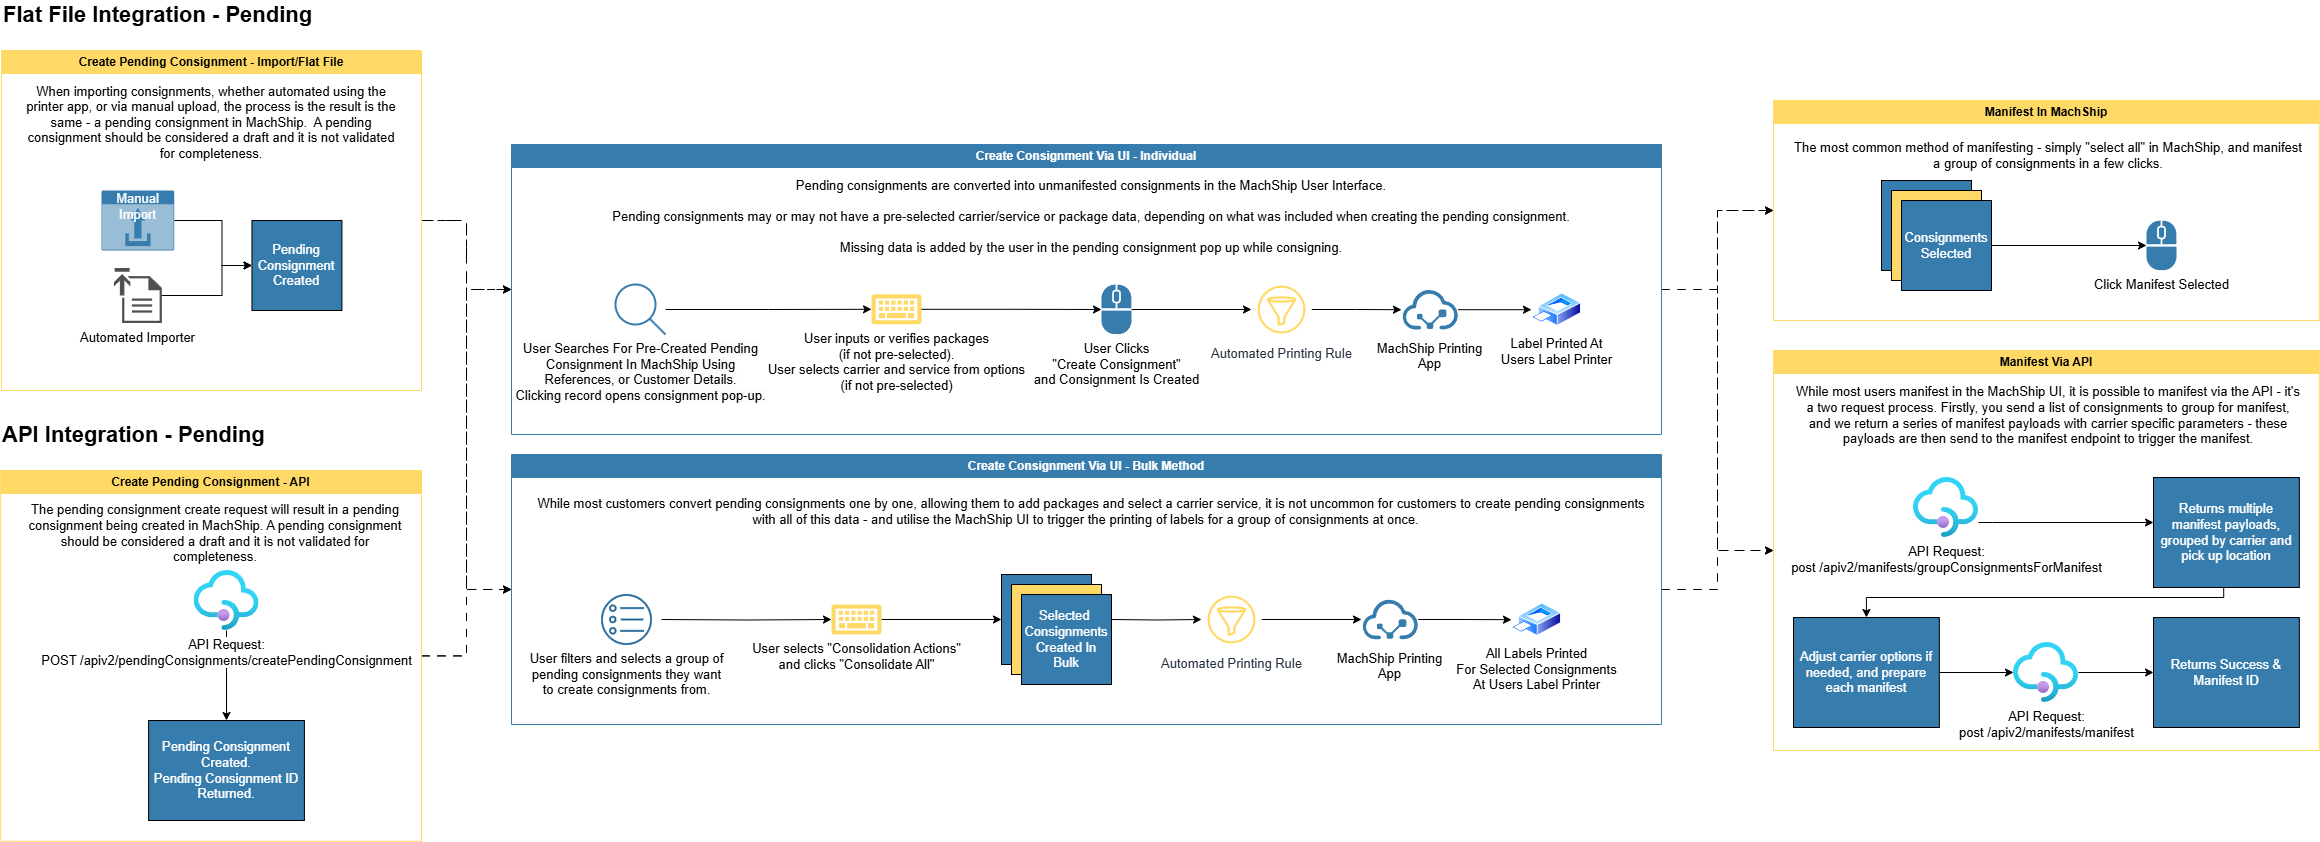
###1. Flat File Via Import
MachShip provides flexible methods for importing consignment data into the platform. Whether you need to upload files manually through our web interface or automate the process through folder monitoring, MachShip supports both standard CSV formats and custom file structures through workflow tasks. This guide helps you understand the available options and choose the right approach for your shipping workflow.
For detailed instructions on how to import consignments, see our import guide here.
###2. Printer app
Once you've got your file importer setup, you can then automate the pick up of your files using our printer app.
For detailed instructions on how to automate your imports using our printer app, read our printer app import guide here.
###3. API Integration
Example 1 - Full From & To Address, No Items
POST https://live.machship.com/apiv2/pendingConsignments/createPendingConsignment HTTP/1.1
token: <api_token>
{
    //the MachShip entity (warehouse and/or brand) to allocate the consignment to
    //only required if you have more than one entity
    "companyId":"1234",

    "fromName":"The Big Store",
    "fromContact":"Bob Smith",
    "fromPhone":"1234567",
    "fromAddressLine1":"1212 The Big AVENUE",
    "fromAddressLine2":"",
    "fromLocation":{
        "suburb":"MILDURA",
        "postcode":"3500"
    },

    "customerReference":"8855292845",
    "customerReference2":"Test00014",
    "specialInstructions": "string",

    "toName":"The Company",
    "toContact":"Mary Jones",
    "toPhone":"0422 222 222",
    "toAddressLine1":"1212 SMALL AVENUE",
    "toLocation":{
        "suburb":"CROYDON",
        "postcode":"3136"
    },
    //adds surcharges for tailgate and residential fees respectively
    "questionIds": [7,13]
}
Example 2 - Stored From Address, To Address & Items
POST https://live.machship.com/apiv2/pendingConsignments/createPendingConsignment HTTP/1.1
token: <api_token>
{
    //the MachShip entity (warehouse and/or brand) to allocate the consignment to
    //only required if you have more than one entity
    "companyId":"1234",

    //a stored address in MachShip
    "fromCompanyLocationId": "1638944",

    "customerReference":"8855292845",
    "customerReference2":"Test00014",
    "specialInstructions": "string",

    "toName":"The Company",
    "toContact":"Mary Jones",
    "toPhone":"0422 222 222",
    "toAddressLine1":"1212 SMALL AVENUE",
    "toLocation":{
        "suburb":"CROYDON",
        "postcode":"3136"
    },

    "questionIds": [7,13],

    //optionall allocate items
    "items": [
        {
            "itemType": "Carton",
            "name": "Box 1",
            "quantity": 1,
            "height": 10,
            "weight": 20,
            "length": 30,
            "width": 40,
        }
    ],
    //optionally pre-allocate a carrier
    "carrierId": 0,
    //optionally pre-allocate a service
    "carrierServiceId": 0
}
Further documentation on the fields available can be found in our documentation here and our full API specification here.
API Response
Machship will return the following after creating your pending consignment:
{
  "object": {
    "id": 12345,
    "consignmentNumber": "PC12345"
  },
  "errors": [
    {
      "memberNames": [
        "string"
      ],
      "errorMessage": "string",
      "validationType": 0
    }
  ]
}
This pending consignment id can be stored by your system, so you can later use it to find the consignment this pending consignment was created from.
Tracking & Pending Consignments
Pending consignments are "transformed" into consignments by a user in MachShip, at which time the pending consignment is deleted, and the consignment is created.
The consignment is tagged with the originating pending consignment Id, allowing you to marry up your original request with the final consignment.
You can also use the reference fields as a way of matching your original request to the final consignment created.
There are variety of fields and endpoints you can use to track consignments, which is covered in depth in this article on tracking via the api
A common way is to hit the "catch all" endpoint - getRecentlyCreatedOrUpdatedConsignments - which returns a list of consignments which were created or updated inside a time period.
GET https://live.machship.com/apiv2/consignments/getRecentlyCreatedOrUpdatedConsignments?companyId=123&fromDateUtc=2023-01-01T00:00:00&toDateUtc=2023-01-02T00:00:00&includeChildCompanies=true
You could poll this daily, or hourly to get updates about all your consignments in a single request - the response would look like:
{
  "object": [
    {

      "id": 1234567,
      "consignmentTrackingStatus": {
        "id": 2,
        "name": "Unmanifested",
      },
      "carrierConsignmentId": "AUSP1234567",
      "customerReference": "ORDER1234",
      "customerReference2": "PO123",
      "pendingConsignmentIds": [
        12345
      ],
      ...//rest of payload
    },
    {

      "id": 1234568,
      "consignmentTrackingStatus": {
        "id": 7,
        "name": "Complete",
      },
      "carrierConsignmentId": "MS1234568",
      "customerReference": "ORDER1235",
      "customerReference2": "PO124",
      "pendingConsignmentIds": [
        12346
      ],
      ...//rest of payload
    }
  ],
  "errors": [
    {
      "memberNames": [
        "string"
      ],
      "errorMessage": "string",
      "validationType": 0
    }
  ],
  "totalItems": 0,
  "startIndex": 0,
  "retrievalSize": 0
}
You can also utilise this response to build the tracking link to send to your platform.
For details on how to do this, read our guide here.
Printing From Pending Consignments
For pending consignments, printing is handled automatically through the MachShip printer app. The setup is straightforward:
- The printer app is installed on a warehouse computer with access to the label printer.
- Once configured in MachShip, you can establish printer evaluation rules that determine where labels are sent.
- These rules typically work on a per-user basis - when a user creates a consignment, the labels automatically print to their designated printer.
For single-printer warehouses, you can simplify this by setting up a warehouse-wide rule instead of per-user rules. This means all created consignments will print to the same printer regardless of which user finalizes them.
Workflow FAQs
How can I get the carrier consignment id after creating a pending consignment? You will not be able to get the carrier consignment id until the pending has been turned into a consignment.
Once there, you can use:
- get /apiv2/consignments/getConsignmentByPendingConsignmentId - using the pending consignment id
- post /apiv2/consignments/returnConsignmentsByReference1 - using the reference 1 you set
- post /apiv2/consignments/returnConsignmentsByReference2 - using the reference 2 you set
All of these endpoints will return the carrier consignment id.