Overview
MachShip provides a fully featured, first class RESTful API layer using well-defined JSON objects. All requests to MachShip are either a POST or a GET which is documented in our API technical documentation.
Essential Knowledge
Prior to starting your integration, we strongly advise you to read the following:
- Fundamentals guide - covers how MachShip works and key terms that will help you understand how our endpoints operate
- Workflow Guides - covers common integration workflows and how to achieve them using our API endpoints
Both of these guides will save you a lot of time and potential mistakes in building your integration - and should only take 10 minutes to read.
Authentication & Permissions
All requests to MachShip require a valid API token, and the token must be provided on each request to MachShip.
This token must be added as a header like so:
token: <api_token>
This token is generated on a user in MachShip, and inherits the permissions attached to that user.
For example, if the given user has view only permissions on consignments, then no API endpoints related to creating consignments would work with that token.
It's important to ensure the user that you're generating your token on has the correct permissions based on what you are aiming to do with our API.
The steps for creating an API token can be found in our article here - How to Create API Users and Tokens.
If you'd like to test your API token, you can do so using our authenticate endpoint:
Ping Request:
POST https://live.machship.com/apiv2/authenticate/ping HTTP/1.1
Host: live.machship.com
token: <api_token>
Successful Ping Response:
HTTP/1.1 200 OK
Body: {"object":true,"errors":null}
If you are receiving a 401 Unauthorized response, please check the following:
- You have correctly entered your API token as a header with the token as the key
- Contact the API token issuer to check that the token is still valid
Sandbox & Testing
Rather than having a seperate sandbox enviroment, MachShip instead has an in-built "test mode".
API tokens are assigned this test mode based on the mode of the user they were created on.
IE. A token that is created on a user that is in test mode, will act as test token. If the user is not in test mode, a token created on that user will be a production token.
Any consignments created using these test mode API tokens will be "test consignments" which can be utilized when testing an integration.
If a consignment is in test mode, it will not issue any external API calls to carriers but will show you exactly how MachShip would work under those circumstances.
You can identify a test consignment in MachShip by:
- The exclamation icon on the consignment listing pages
- The test mode banner on the consignment view page
It is advisable to create a test and production mode user for the purpose of your integration (MachShip does not charge fees for users or API tokens), and create a token on each. Alternatively, you can create a single user, and switch that user between test and production modes, which will change your API token from testing to production.
Instructions on how to create a user and API token can be found here - How to Create API Users and Tokens.
Integration Workflows
Pending Workflow Implementation
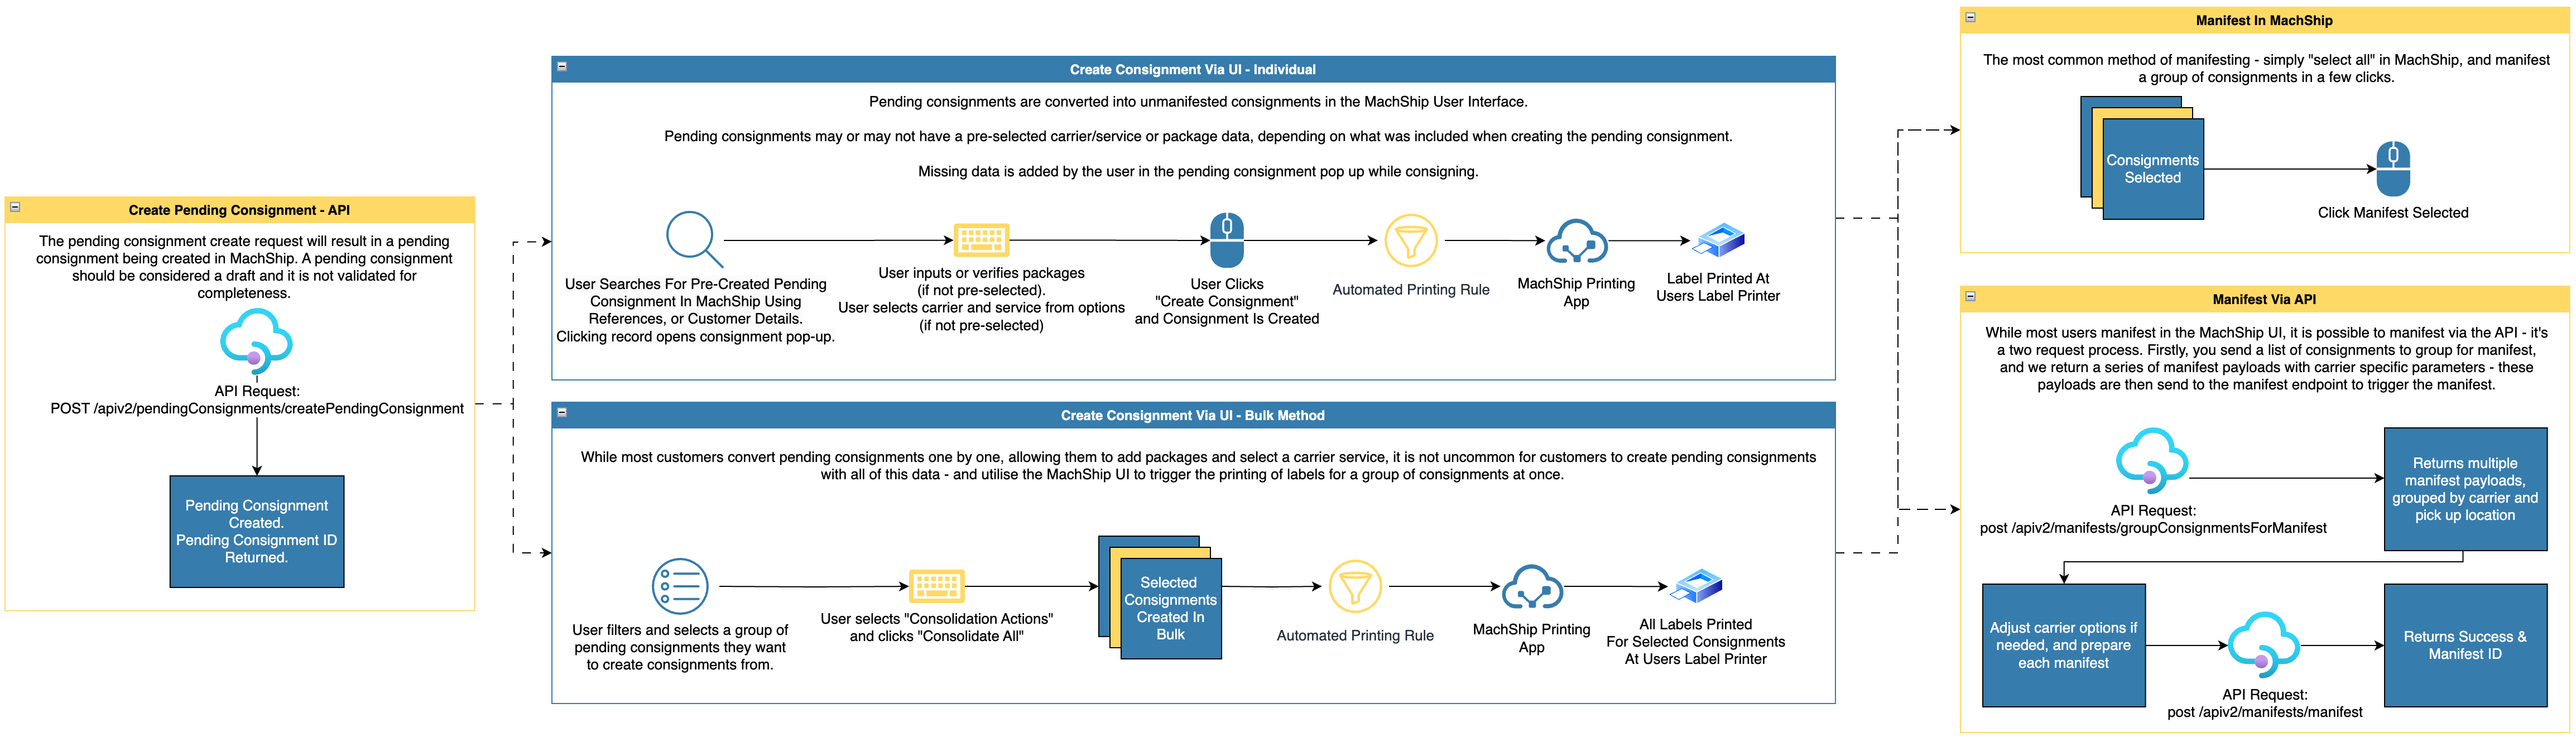
Related integration guides:
- Generating Prices & Routes Via The API
- Creating Pending Consignments (Draft)
- Printing & Getting Labels
- Manifesting Via The API
- Tracking & PODs
Unmanifested Workflow Implementation
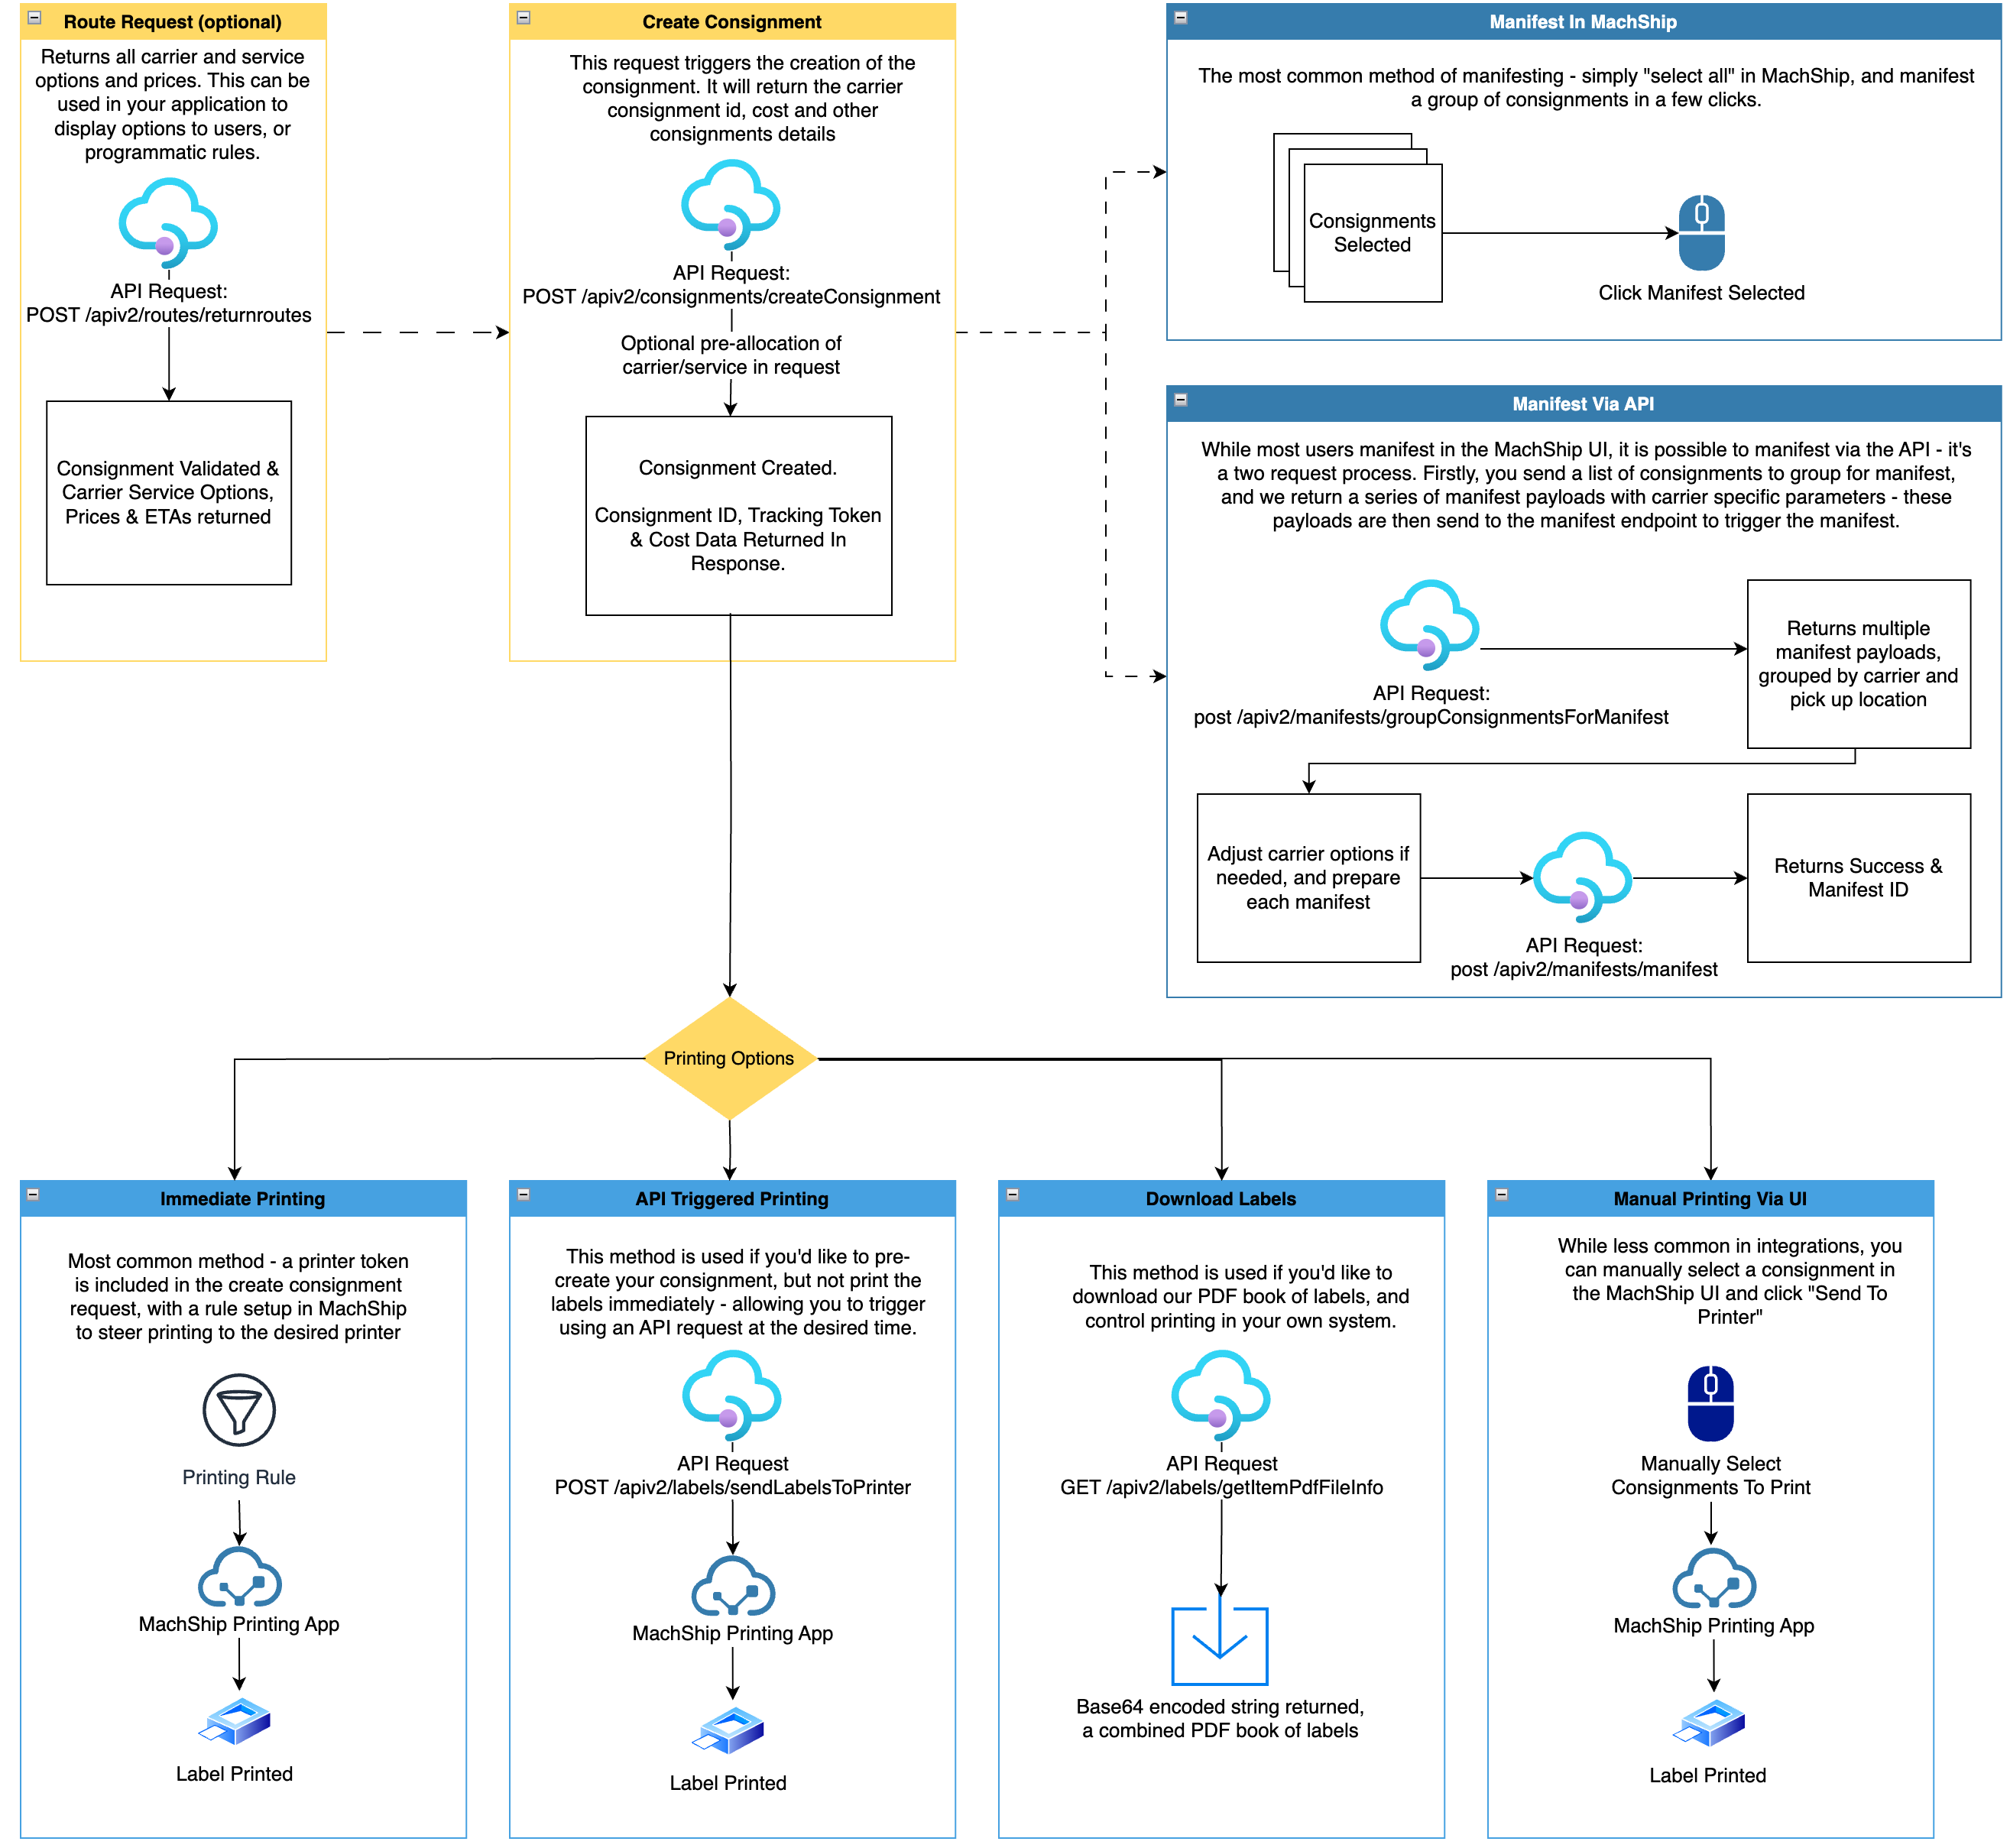
Related integration guides:
- Generating Prices & Routes Via The API
- Creating Consignments
- Printing & Getting Labels
- Manifesting Via The API
- Tracking & PODs
Most Popular Articles
The following is a list of our core integration guides:
- API Users & Tokens
- Generating Prices & Routes Via The API
- Creating Consignments
- Creating Pending Consignments (Draft)
- Tracking & PODs
List Of API Endpoints / Swagger
Our online API definition documentation can be found at https://live.machship.com/swagger.
A few notes on the swagger documentation:
- If you click the Authorize button at the top of the page and enter your API token, you can then call MachShip’s API directly from within this documentation. This allows you to test your API calls and JSON objects directly through the browser. Examples of the objects in both the requests and responses can be found in this API help documentation.
- In the example request and responses section, you can click Schema to reveal all the fields and potential values.